

Tuesday, December 29, 2009
One Last Christmas Memory
Before the month of December officially ends we are trying to squeeze a few more Christmas memories and traditions in! Last night Caleb had a blast while walking through "Christmas Village" in Downtown Ogden. Lucky (or unlucky...depends on how you look at it!) for us Caleb never tires of the mezmerizing lights! Christmas simply wouldn't have been the same without our beloved little man! The magic that only a child can bring to Christmas, was most certainly what got us through this hectic month!

Monday, December 21, 2009
The True Meaning of Christmas
Just around this time of year when I have a thousand things to do, and not enough time to do them all; when I'm standing in holiday lines and losing my patience with my fellow human beings; when I'm reminded of the harsh reality of our finances...or lack there of, I find that it is necessary to STOP, TAKE A BREATH and remind myself just what Christmas is all about! You see--its easy to get sucked into the shopping and the presents...the stress and the burdens but THIS is what Christmas is really about:


Joy came down on Christmas Day
As angels came to earth
Heralding the miracle
of our Messiah's birth.
- Anonymous
Monday, December 14, 2009
I Just Know...
Not only was I inspired by Tami's challenge @ GIS...to take to our blogs this month and write about how someone shows love for us, thru actions rather than words--but I was also very inspired by her own post at her blog Tidbits in which she equated her husband's love to the frequent gesture of Pepsi! So It is with that in mind that I, began writing the following post:

It can be said with absolute certainty that I love my son more than anything in this world! He is the most beautiful and precious thing in my life (don't worry dh you are a VERY close second!)! In my many scrapbook los and to anyone who will listen, I have atested to my insurmountable love for this adorable little boy! My son, on the other hand, tends to shy away from any type of actions that may show that this love is reciprocated. He hates kisses...he refuses to say "love you" and he reserves his best hugs for when daddy comes home from work! He does often give me gifts like cobwebs, ABC food and random objects he has picked up and is now finished playing with. But I don't think these things really say LOVE! He does, however, have a sixth sense about when mommy isn't feeling well or is upset and he reserves something special for those times. Caleb enjoys a good ba-ba when he isn;t feeling well...so it is natural that mommy would be the same...right? So Caleb totes the 20 oz of Diet Coke I am nursing over and says "MOMMA." Sometimes he even brings over empy cans or bottles...but always Diet Coke...because thats what momma likes in her ba-ba. Its a small gesture I know...but thats how I just know--He Loves Me!

Saturday, December 12, 2009
That's a Wrap!
Time to get busy on my Christmas wrapping...now that I am done with with all of the gifts I've made this season! And let me just be honest with you...I hate wrapping...if I could pay someone else to do it for me...I would! But since that is not really an option, to save a little money this year we decided to buy brown shipping paper found a bulk roll for $5.00)and decorate with some homemade tags and leftover ribbon from last year! Give making your own Christmas tags a try this holiday season...Tim Holtz has a fabulous Blog Series going on right now "The 12 Tags of Christmas" with great step by step instructions, or Pattie Knox has some cute digital tags available for free download. You can even buy mailing labels and use your digital imaging software to make your own. I created mine on PSE 7, but will be printing them out on cardstock and tying them on with ribbon! Just a few idea for those finishing touches on your holiday gifts!


Thursday, December 10, 2009
And The Winner Is...
WOW...look a little different around here...I'm doing some redecorating for the new year!
Anywho...the moment you've all been waiting for :drumroll: the winner of The Twelve Days of Christmas Drawing for a $30.00 gift certificate to ANY Get It Scrapped! class is:
Chris aka Scrappylassie said...
Another idea that is so versatile...can be made to fit holiday theme or everyday...thanks, Amy!
December 1, 2009 5:42 AM
Congratulations Chris! Please email or pm me with your email address so I can send you the gift certificate code! I'm dying to know what class you're going to take...!
Thanks to all of you for stopping by each day and for all of your wonderful comments! Beginning in January I will have project ideas available on the Get It Scrapped Forum, so keep a look out! Enjoy your Holidays everyone and I'll have many more fun projects for you in the new year!
Wednesday, December 9, 2009
Baby It's Cold Outside!
We just got back from a wonderful sledding trip not far from our home...Caleb's first! And BABY its cold outside! But you wouldn't know it to look at my new blog would you...I decided it was time for a face lift...and here in Utah where the temps are averaging 10 degrees, I thought a change that wouldn't remind me of the cold was in order!

The cold didn't seem to bother Caleb much...here he is literally rolling in the snow.I have a feeling this won't be out last snow day...so momma needs to get her some snow pants!

Tuesday, December 8, 2009
On the Twelfth Day of Christmas

DIGITAL SKETCH
Supply List
Frame (1.00)
Photoshop/PSE
Photo
Wow this has been fun, everyone! Thanks for taking time out of your busy holiday lives to pop in and take a look at my Christmas gifts over the past week and a half! I hope you've gotten some good ideas and I also hope that I've helped save you a little money this Holiday Season! Can you tell I'm a big fan of photo and digital gifts? The truth is they save a lot of money and time... something I think we are all in a bit of a shortage of around this time of year! My final gift idea was inspired by my Father in law, who loves the outdoors and enjoys the art of photography! Every year I present him with some type of photo gift...because out of everyone in my family I know he appreciates them the most. This year I took a photo of his favorite Mountain Range, located just a ways from his childhood farmhouse, and turned it into a digital sketch, using my Photoshop Elements filters, some fabulous directions provided in Pattie Knox's Even More Mad Digital Skillz and a frame from the dollar store! With Photoshop/Photoshop Elements you are not limited to Colored Pencil sketches such as this, you can turn your photos into paintings, pencil sketches, coloring book pages and more. Find out more about these techniques from Lynn Weber's class Fun Photo Effects.
If you are interested in brushing up on your photoshop skills to save some of the time and money that going digital affords, then you should definitely look into the variety of classes offered at Get It Scrapped for Photoshop users! I took my very first digi class with Pattie Knox and she had me Photoshoppin' in no time and I haven't looked back! Enter the drawing for the final time by leaving a comment in today's thread. All entries must be in by 8pm tomorrow and I will post a winner on Thursday the 10th! Thanks for joining me for some Holiday Fun! Happy Gifting!
Monday, December 7, 2009
On the Eleventh Day of Christmas

HOLIDAY GIFT BOX
Supply List
Small Tin or Box (1.00)
Solid Colored Cardstocks
Paint
Ink
Stamps
Embossing Powder/Pad
Heat Gun
Ribbon
Eyelet
Hole Punch
Coffee Filters & Muffic Cups
Pop Dots
Adhesive
Needle and Thread or Sewing Machine (optional)
Keep in mind your supply list may vary considerably from mine depending on how your choose to layer your gift box...but its a good starting point!
Can you believe it's almost over?! Me either:sad: Well I can't give you all of these gift ideas without an idea for something to put your gifts in...now can I! Here's an idea to help you dress up your Holiday tins and gift boxes quickly and easily and put the finishing touches on any gift you give this season.
Start with finding your gift box. It doesn't really matter the shape or size, as this design is easily adaptable. Dollar stores and local stores should still have a pretty good selection! Next choose your colors of cardstock, paints and ink pads so that they will all coordinate with each other. As you can see I have chosen navy acrylic paint, a dark cardstock and a lighter cardstock in blues, and a royal blue ink pad to stamp on the light blue and a chalky white to stamp on the navy. I have then chosen a white cardstock for matting and a fun glitter embossing powder to add a little zing to the center element of the gift box. You don;t have to stick to a monochramatic color scheme as I have...I simply wanted to give you an idea of how many colors to select in each of your supplies...so when it comes to COLOR, let your imagination soar! Begin by painting your entire box...INSIDE too! (if the finish that is on the box you've chosen does not coordinate with the rest of your choices...if it does then lucky you...you can skip this step!) Next you need to cut out the layers for your gift box lid. The first layer should be the exact surface size of your lid. I used a coffee filter for my first layer, which was 6 inches in diameter, I crumpled it and inked it and adhered it to my box with adhesive. Your next layer should be roughly an inch to an inch and a half smaller than your first. On this layer I used a snowflake stamp and my blue stamp pad to create a subtle print on my light blue cardstock and inked the egdes. I centered the piece and adhered it to the bottom layer using pop dots for a three dimensional look. Your next layer should be an inch smaller than the previous. On this layer I stamped with a chalky white stamp pad using a different snowflake stamp. I then used a muffin cup to mat this layer and stitched the two pieces together using my sewing machine. Again you'll want to center your layer and use pop dots to adhere it to your gift box. Now you'll want to determine how many layers will suit your gift box, but for my next layer I added a mini muffin paper cup that I used adhesive to secure it to the box. Then you'll want to have an eyecatching centerpiece for your final layer. I chose to create a tag out of my navy cardstock with chalked white edges, an 1/8 of an inch white mat and an embossed glittery snowflake. I completed the look of the tag by adding an eyelet for the ribbon to be threaded thru and tied in a bow. Secure your final layer with pop dots and your gift box is all set to fill with whatever you like!
Want to learn more about using stamps and inks to complete everything from cards to scrapbook los, to projects like these...then Sharyn Tormanen's Get It Stamped is perfect for you! Learn about embossing, masking,and shopping, as well as, caring for your stamps, all in one class, only at Get It Scrapped! Enter to win a drawing for $30.00 towards any Get It Scrapped class by leaving a comment below! Happy Gifting!
Want to learn more about using stamps and inks to complete everything from cards to scrapbook los, to projects like these...then Sharyn Tormanen's Get It Stamped is perfect for you! Learn about embossing, masking,and shopping, as well as, caring for your stamps, all in one class, only at Get It Scrapped! Enter to win a drawing for $30.00 towards any Get It Scrapped class by leaving a comment below! Happy Gifting!
Sunday, December 6, 2009
On The Tenth Day of Christmas

LAMP SHADE
Supply List
Lamp Shade (1.00)
Paints, Mists, Papers, Fabrics, etc.
Adhesives (appropriate for the mediums you are working with)
Needle and thread*
Decoupage*
Hair Dryer *
(not necessary for all methods of decoration...just the method I've outline here!)
Lamp shades are another fun way to use your creativity and a dollar to create the perfect gift for a loved one or friend. And best of all you can use virtually any medium to decorate them with (paint, paper, fabric, etc)...so use what you have! To find Lamp Shades at Rock bottom prices check your dollar stores, clearance sections at your Walmart or Target (where I found mine for $1.00), outlet stores that sell home decor such as Ross or Tuesday Morning, or even try online at ebay or overstock.com. Once you've found your shade, deciding on a basic color scheme and design would be beneficial so that you may work in layers. Now you're ready to start getting CRAFTY! Begin by choosing a method to cover your lamp. You could cover it with fabric, paint it, use paper piecing, leave it unfinished, or I chose to mist mine with a fabric mist (a lot like spray ink, but not water-soluble). These inks do have to be heat set, so I used my hair dryer (at a safe distance) to do so. Next I used a piece of bubble wrap and brushed it with white gesso and stamped it onto the surface of my shade. You want to make sure each layer dries completely before moving onto the next. So once dry I added my silk greenery using a needle and thread to tack it to the lamp shade in a location that I knew would be overlapped by my paper heart. The heart was a digital element that I printed out, trimmed and coated the back with a fast drying fabric adhesive. If you want you could place a thin layer of decoupage over the paper element to seal the edges, however I chose not to because I like the dimension created by the lifted edges. Then using a stencil, a stipple brush and some custom colored acrylic paint I added a little word art to my shade.
The layered collage look that I created on my lamp shade is just one of many ways that you could decorate your lamp shade...if this method suits you---well then you already to begin--if not, then I urge to experiment and find the right method for you and the person you are gifting! And if you'd like to learn more about layering and collage then you would LOVE Dina Wakely's Art Journaling classes available at Get It Scrapped. I love Dina's fun style and eye catching techniques, but the thing I love most about her classes is that she shares her process with you and essentially gives you the tools to develop your own style! Leave a comment in today's thread to be entered to win $30.00 towards any class at Get It Scrapped, including Dina's!
Saturday, December 5, 2009
On the Ninth Day of Christmas!

PERSONALIZED OFFICE ART
Supply List
Basic Frame (1.00)
Photoshop or Photoshop Elements
Supply List
Basic Frame (1.00)
Photoshop or Photoshop Elements
DIY Alpha or Font
Photos
Are you looking for that perfect gift for dad, or maybe you're searching for yet another way to gift your photos, well have I got an idea for you. Using Photoshop, a wonderful tutorial from Paula Gilarde and a little bit of creativity you can turn your words and your photos into art, that any loved one would appreciate! Start by choosing the word you wish to turn into art. Then you will need at least one photo for each letter of that word, that in someway relates to the word you have chosen or the person you are gifting. Open your photos in photoshop and then decide on a font or alpha. Don't have photoshop or photoshop elements...no problem click here for a free 30 day trial. Now I have used a DIY alpha by Pattie Knox called Text Bytes No. 17 or by following Paula's tutorial, you can use any font installed on your computer! Next open Paula's tutorial and follow each of the steps outlined by Paula and repeat them for each letter of your text. Once you are done you may need to re size your document based on the size of frame you will be using. And you may choose to place a border stroke around the edge to make your word art pop and presto, all you have to do is PRINT!
Paula has tons of great ideas just like this one, waiting for you in Paula's Hybrid Corner on the Get It Scrapped forum. If you are interested in digital scrapping but aren't sure where to start, then these FREE tutorials are just right for you! Leave a comment in today;s thread to be entered in the drawing for $30.00 towards any Get It Scrapped Class...See you Tomorrow!
Friday, December 4, 2009
On The Eighth Day of Christmas

WINTER SCARF
Supply List
Scarf ($1.00)
Fabric and Lace Scraps
--AND/OR--
Premade Appliques and Embellies
Needle and Thread
Heat n Bond
Fabric Glue (may be needed)
Bring your friends and family a little warmth this COLD winter season, with their very own, one-of-a-kind, definitely made with love Winter Scarf (or gloves, and hats work too!) Peruse your local dollar store, or even the Walmart or Target in your area for low prices on winter basics. Then use your fabric scraps, pre-made appliques and embellies to jazz them up a bit, by adding a few personal touches. Start by raiding your stash and choosing fabrics, embellies, etc., whose colors, coordinate. Try using a variety of different prints and textures for a little bit of added interest! Now decide on a design...you can draw it out on paper to create a pattern or you can simply move things about your article until you like the looks of it! Use Heat n Bond to adhere larger elements, like I have done with my lace applique, and a needle and thread for smaller elements such as flowers or butterflies. Once all of your elements are securely fastened then stand back and admire your work (and don;t forget a pat on the back for a job well done!) because you have just completed a beautifully handcrafted gift for someone special!
Interested in learning more about using fabrics in your projects and lo...or maybe you've been wondering which kind of fabric adhesive to use with what...or maybe you are just dying to learn how to make those adorable rag flowers (I know I was!)...either way Tania Willis' Scrapbooking With Fabric class (available at Get It Scrapped) is definitely for you! Enter to win $30.00 towards ANY Get It Scrapped! class by leaving a comment below!
Thursday, December 3, 2009
On the Seventh Day of Christmas

FRAME
Supply List
Frame (1.00)
Coordinating Patterned Papers and Scraps
Misc. Elements
Misc Alphas
Decoupage
Photo Frames are another way to make giving the gift of a photo special to the person you are gifting. It is also an excellent way to use up your scraps and left over embellishments and alphas. First you need to select a frame! Unfinished wood frames are in abundance at your local dollar stores, but are also available at your craft stores (I.e Michaels, Joann’s for roughly the same price). Now I like to approach my frames much like a scrapbook lo and do a brief sketch before beginning…this may or may not help you…but give it a shot. Once you’re set on a design begin by treating the edges of frame (inside and out). You can use ink, paint , wood burning or leave them unfinished…its up to you. But you’ll be happy you completed this step first after you get your frame all put together.. Now because some of the frame will be coated in Decoupage and other parts like your elements and ribbon will not need to be sealed, consider working in order as far as your layers are concerned. So our first layer will involve covering your frame with your coordinating papers and paper scraps by first applying a thin coat of decoupage directly to the frame. To cover your frame you can use a collage technique or a block design, or you can use a simple layered design like the one I’ve used here . After you’ve covered your frame with your paper then apply a generous layer of decoupage over the top, paying close attention to your corners and edges and making sure to smooth out any bubbles along the way. After the decoupage is dried you can continue with your other layers. Next use adhesive to apply your ribbon, flowers, embellishments, and alphas. In this frame I have used my nieces monogram EC, as well as using cutouts from various paper scraps to create the elements on the frame. If you too are using paper elements that you are concerned about their durability (like my butterflies), then coat them in decoupage and let them dry before applying them to the frame. Often wood frames do not come with glass in them but you can use glass from an old out-of use frame of the same size and it will likely fit the opening. Now you are ready to place you photo in it and give it as a gift!
My favorite part of this frame is my niece’s monogram in the upper right hand corner. I love the way that a pair of mismatched letters can really accent a collaged or layered effect! But I might never have used these alphas for that purpose if I had not read Debbie Hodge’s ebook Embellishing With Alphas . Not only does this book contain great ideas about using up your extra alphas, but it also teaches several important design principles that can not only be implemented with alphas, but with any type of embellishments! Get this amazing read today at Designer Digitals!
Wednesday, December 2, 2009
On the Sixth Day of Christmas...

PHOTO RUBIK'S CUBE
Supply List
Rubik’s Cube ($1.00)
Adhesive Backed Paper
--OR-- Adhesive and Photo Paper
Computer Editing software (optional)
Paper Trimmer/Scissors
Ruler
Kids and adults alike, will love this new twist to an old game! First you need your cube...which are available at many dollar stores...or I got mine in the dollar bin at Michae's. Choose six photos of the person you are gifting, their family or even some of their favorite things. And using your photo editing software, resize your images so that they correspond to the measurements of your Rubik’s cube (they do vary in size!). I chose to recolor my images as well, for fun and to make it a little less challenging for my 8 year old nephew, but this is optional. Then print your photos on adhesive backed paper or even name badge stickers will work (depending on their size and the size of your cube) . Then measure your squares on the cube and cut your photo into equal number and sized squares (so that the cube is still a functioning game). Then remove the backing from your adhesive paper and apply each of the pieces onto the cube revealing your picture. Repeat with each of the six photos and you will have a fully functional photo Rubik’s cube! If you don’t have photo editing software then you have two options you can download a free 30 day trial of Photoshop Elements 8 here or you can simply crop down your 4x6 photos and apply your own adhesive to each individual square--paying close attention to the corners and edges to prevent lifting. Either way you’ve got yourself a personalized photo cube that is sure to be a hit!
Would you like to learn more about resizing and re-coloring your photos, you can learn these techniques and so many more from Lynn Weber at Get It Scrapped. She’ll have you using Photoshop or Photoshop Elements to edit your photos to perfection in no time at all! If you leave a comment in today's thread you can be enetered to win $30.00 towards Lynn's classes or ANY class taught at Get It Scrapped! Happy Christmas Crafting to All!
Tuesday, December 1, 2009
On the Fifth Day of Christmas

CHRISTMAS CARDS
Supply List (for one card)
Solid Cardstock
Coordinating Patterned Papers/ Solids
Black (or a dark coordinating solid) cardstock
Corner Rounder (or scissors work too!)
White and Black Sharpie or Gel Pen
Coordinating Alphas (1.00)
Ribbon
Paper Trimmer or Scissors
Adhesive
Still haven’t got those cards made yet…that’s ok…plenty of time…especially if you pick a simple design and use bold colors/patterns and some fun alpha stickers to really punch it up! Visit your local dollar store and you’ll be surprised of the variety of alpha stickers in stock! Now my card measures 5.5” by 7” but make it whatever size you like…just make sure it will fit in a standard sized card envelope for mailing. So after you’ve cut your card to size use a paper folder or even an unsharpened pencil or Popsicle stick to crease your card. If you’ve chosen to use a textured cardstock for your card make sure you place the fold so that the texture is on the outside , then find the front of your card and trim 1.5” off the edge and round your corners. Now measure the front of your card and take away a half inch from the height and a fourth of an inch from the width and this is the size you will cut from your patterned paper. Mount the patterned paper on the front of your card, using adhesive, so that there is a fourth of an inch of your solid cardstock showing on three sides and the paper is flush with the crease of your card.. Now mat the inside of your card with a third coordinating paper, by measuring the right side of the inside of the card and taking away a half of an inch off both the width and height. Mount using adhesive. Now its time to decorate your card. I chose to run a ribbon across the card, approximately an inch from the top of the card, repeat on the inside on the card making sure that the ribbon lengths match up. Now get out your alpha stickers and construct your sentiment . You can choose to spread the words over both planes of your card as I have done or you may decide you only want them on the front of your card and not overlapping onto your inside tab. Then choose a simple shape…such as a tree or a heart or a star, cut it out of your black (or dark coordinating solid) card stock and then cut it in half (if you are using both planes of your card). Adhere one half of the shape down in the front bottom right hand corner of your card and the other in the inside right hand bottom corner--making sure the images line up when the card comes together. Now take your Sharpies and do some outlining around your alphas, as well as your shape, to create some unity and make your elements pop!
Making your own cards for the holiday can be a lot of work...but it doesn't have to be...choose a simple design and wow with your colors and embellishments, and you'll be mailing those precious handmade salutations in no time! For more help on making your own cards including tips on designing, techniques and more step-by step tutorials, give Tania Willis' class Beautifully Handmade Cards a try--available at Get It Scrapped in self -paced format!
Monday, November 30, 2009
On the Fourth Day of Christmas

DECORATIVE PLATE
Supply List
Here are the steps I've taken to create my decorative plate:
1. First I’ve taken this photo of my son, done some editing to give it an aged and somewhat transparent look and cropped it in the perfect size to fit inside of my plate (that I got for a 1.00 mind you…never underestimate the dollar stores ladies!).
2. Now if you are printing off your own picture I suggested copy paper instead of photo paper because the printed image will saturate the paper instead of sitting on top (as it does with photo paper). This makes the image and ink less transferable--however, you must wait for the photo to dry COMPLETELY before applying the decoupage…otherwise you will simply be smearing your printer ink around on a plate!
3. Apply a thin layer of decoupage to the surface area of the plate and starting in the center, begin laying down your photo. Flatten the image onto the plate working the bubbles and wrinkles from the middle out to the edges.
4. Once your photo is flat and mostly dried, you can begin applying a top coat of decoupage taking care to make nice even strokes for the best finish possible. Once the decoupage has dried completely you can add details to the rim of your plate if you choose to further compliment your giftee’s style. My plate already had a very subtle design and since my grandfather is a very subtle guy I chose to let the image on the plate speak for itself…but don’t let this stop you…embellish away!

So long story short…a photo is the perfect gift to give on Christmas Day…your family loves you and enjoys seeing your sparkling smile on their end table…or your beautiful son staring back at them from a plate hanging on their wall, or even the beautiful photo of their favorite mountain scenery printed on canvas…the possibility of photo gifts are endless. Check back later in the week for many more photo gift ideas! And if you’re thinking of brushing up on your photography skills-- well Katrina Kennedy is waiting to help you do just that! Beginning next year join her for her NEW! online photography class at Get It Scrapped! Where she’ll be discussing the principles of Composition…trust me DON’T MISS THIS CLASS! In the mean time check out her ebook "Get Me Off of Auto" available at Designer Digitals
Supply List
- Plate (1.00)
- Regular Copy Paper
- Photo Editing Software
- --OR--
- 8x10 Matte Photo and protractor
- Decoupage
- Paints, Inks, Misc. Embellishments
- Circle Cutter or Scissors
Here are the steps I've taken to create my decorative plate:
1. First I’ve taken this photo of my son, done some editing to give it an aged and somewhat transparent look and cropped it in the perfect size to fit inside of my plate (that I got for a 1.00 mind you…never underestimate the dollar stores ladies!).
2. Now if you are printing off your own picture I suggested copy paper instead of photo paper because the printed image will saturate the paper instead of sitting on top (as it does with photo paper). This makes the image and ink less transferable--however, you must wait for the photo to dry COMPLETELY before applying the decoupage…otherwise you will simply be smearing your printer ink around on a plate!
3. Apply a thin layer of decoupage to the surface area of the plate and starting in the center, begin laying down your photo. Flatten the image onto the plate working the bubbles and wrinkles from the middle out to the edges.
4. Once your photo is flat and mostly dried, you can begin applying a top coat of decoupage taking care to make nice even strokes for the best finish possible. Once the decoupage has dried completely you can add details to the rim of your plate if you choose to further compliment your giftee’s style. My plate already had a very subtle design and since my grandfather is a very subtle guy I chose to let the image on the plate speak for itself…but don’t let this stop you…embellish away!

So long story short…a photo is the perfect gift to give on Christmas Day…your family loves you and enjoys seeing your sparkling smile on their end table…or your beautiful son staring back at them from a plate hanging on their wall, or even the beautiful photo of their favorite mountain scenery printed on canvas…the possibility of photo gifts are endless. Check back later in the week for many more photo gift ideas! And if you’re thinking of brushing up on your photography skills-- well Katrina Kennedy is waiting to help you do just that! Beginning next year join her for her NEW! online photography class at Get It Scrapped! Where she’ll be discussing the principles of Composition…trust me DON’T MISS THIS CLASS! In the mean time check out her ebook "Get Me Off of Auto" available at Designer Digitals
Sunday, November 29, 2009
On the Third Day of Christmas...

WALL ART
Supply List
Canvas (1.00)
Spray Mist
Stamps
Clear/White Embossing Powder and Heat Gun
--OR--
White Stickers
Patterned Paper
White Paint or Gesso and Paint Brush
Decoupage
Make a personalized piece of wall art for a family member or friend this holiday season to show how much you truly care. Once you have your canvas , you’ll want to select your color scheme. Choose a patterned paper, or piece together several for a “blocked look.” Then choose paints, and mists that will compliment this scheme. Cover your canvas with a generous layer of decoupage and place (or piece) your paper over the canvas, taking care to smooth out any bubbles or wrinkles, then apply a generous layer over the top of the paper as well. After the decoupage has dried, use your white paint or gesso to blend the edges of the paper into the blank canvas edges. Then give your art some dimension by dry brushing over the paper with light strokes of a complimenting color--this gives it a somewhat distressed look and takes away some of the gloss from the decoupage. Next use your stamp(s) and embossing pad to stamp an image onto your canvas (try placing something under the canvas to give yourself a hard even surface to work with). Apply clear (or white if your paper is extremely dark)) embossing powder to the stamped image and use your heat tool to complete the embossing on your canvas(Note: be careful not to get too close…you don’t want to melt the canvas!) . Then use your misting spray, to spray over top of the canvas for an “ink resist” effect. Give the ink a minute to seep in and then blot it. And now you have a wonderful piece of art that you will be proud to sign your name in the corner of and give to that special someone!
If you don’t have embossing tools…no worries Dina Wakely has a fabulous alternative for you, which will achieve this very same effect! Find her tutorial at Get It Scrapped!, where there are tons of tutorials, project ideas, sketches and more…and best of all they’re FREE…all you have to do is become a registered member ! Leave a comment in today's thread to enter the drawing for a $30.00 gift certificate towards ANY Get It Scrapped class! And hopefully I'll see you tomorrow for yet another 1.00 gift idea!
Saturday, November 28, 2009
On the Second Day of Christmas...

HOLIDAY HEADBAND
Supply List
Headband (3 for 1.00)
Fabric, Felt and Lace Scraps, Silk Flowers, and die cuts
--OR--
Bought Embellishments
Buttons
Needle and Thread
Hot Glue
Looking to dress your little princess for less this Holiday season…using your scrapbook embellishments (handmade or bought) you can do just that. And why stop at headbands, dress up their socks, necklaces and even handbags! Simply layer your embellishments, preferably fabric (as they hold up to the elements a little better) and sew or glue them together. Then hot glue (to plastics or metals, etc) or sew them to your article.
Ta-da! Easy as that!
If you’d like to learn to make your own Beautifully Handmade Embellishments for all of your layouts and projects, then join Tania Willis in learning to make yoyos, rosettes, posies and more--only at Get It Scrapped! Her class is available in self-paced format until the beginning of next year or join her early next year when her new and improved class goes live! And once again don't forget to leave a comment for today to be entered in the drawing for $30.00 towards ANY of the classes offered at Get It Scrapped!
Friday, November 27, 2009
On the First Day of Christmas...

HOLIDAY ADVENT CALENDAR
Supply List
Package of Magnetic Sheets (4 sheets) (1.00)
Non-Stick Mini Muffin Tin (24 count)
Ribbon to Hang (2 ft)
Bulldog Clips (2)
Acrylic Paint & Paint Brush
Patterned Paper
Misc. Embellishments
Misc. Ribbon for Pull Tabs (if needed)
This fun and simple Advent Calendar allows you to use what you have to make the perfect holiday gift for someone special. The one item you might not have is your magnetic sheets, but not to worry, they are available at Walmart, Target and most local discount stores for usually no more than a dollar! Simply cut 24 circles out of your magnetic sheets measuring roughly 1/8 of an inch larger than the opening of the muffin cups on your mini muffin tin. Cover the circles with patterned paper, number them 1-24 and decorate as you see fit, using up extra embellishments, alphas, chipboards, etc! You may want to create ribbon pull tabs for your circles so that they may be easily pulled off to reveal your treats. If you like the crackled paint effect featured in the photo above, then make sure you have a non-stick pan and paint over it with the acrylic paint color of your choice. You will notice shortly after coating it, that the paint will redistribute because of the non-stick coating…this is OK! Be careful not to brush against it and wait for it to dry. You will then want to coat the tin with a sealant so that the acrylic paint does not brush off (Note: make sure to use only wrapped treats inside your advent calendar if the sealant you have chosen is not food safe!) Hook your bull dog clips to the top, thread your ribbon through and its ready to fill with treats and hang!
Looking to learn more about utilizing your stash to put the perfect finishing touches on all of your projects and layouts, then check out one of Doris Sander’s Product Pizazz classes, at Get It Scrapped! Trust me, once you’ve started her first one, you’ll want to take all three! And don;t forget to enter your name in the drawing for $30.00 towards any Get It Scrapped class, by leaving a comment on this thread! You can leave one each day, so I look forward to seeing you over the next eleven days! The winner will be announced Dec. 10th! Good Luck!
Tuesday, November 24, 2009
2009 Holiday Blog Series:The Twelve Days of Christmas

Beginning Friday Nov. 27th I will present 12 fun gift ideas, over 12 days, that you can make for your loved ones and friends for just $12 ($1 ea)! Featuring great holiday bargains and dollar store finds and showcasing the techniques taught in a handful of online classes available at Get It Scrapped, all these gifts will allow you to utilize the things you have on hand, with the addition of one item and a whole lot of creativity! Join me each day for a new gift idea and a chance to win $30.00 towards a Get It Scrapped class of your choice! Just leave a comment in each day’s thread to be entered to win! The winner will be announced Dec. 10th! Have a Happy Thanksgiving and I’ll see you Friday!
Saturday, November 21, 2009

Thursday, November 19, 2009
Bragging Rights!

I'm not usually one to brag, but I'm gonna, because it simply must be said...My kid is definitely grosser than your kid (I hear there is a bumper sticker in the works)! Allow me to illustrate:
1. He eats cat food...but let's face it...who hasn't?!
2. He gargles his milk and more often than not spits it out at you when he's through.
3. He loves to play with cob-webs and even gives them as gifts.
4. He loves to roll around in dirty clothes and usually goes out of his way to dump his hamper in preparation for the event.
5. He hunts for treasures in the pile that I am currently sweeping off of the floor (often redistributing that which I've just swept, back over the floor.)
6. I always find him munching on food that I have no idea where it could have come from and once he has swallowed it, I must try very hard not to think about it!
7. He is a streaker...every time I turn around I find his clothes in a pile and he's running around the house like a crazy person...every once in a while I catch him trying to take off his pants in public!
8.He used to love to chew on shoes...something I thought only dogs did!?
9. He is ALWAYS picking his nose...in fact I am certain that one nostril is now noticeably larger than the other!
10. And finally the absolutely grossest thing ever....he decided to let mommy know that he needed a diaper change by reaching inside of it and handing mommy a surprise...ugh ABSOLUTELY DISGUSTING...enough said!
So you think your Kid is gross then BRING It! But until then, my kid reigns supreme as the Grossest of the Gross *gushing with pride*
Tuesday, October 27, 2009
OCTOBER=Leaves

If I could sum up our October in one word it would have to be LEAVES! We admired them, we played in them we raked them, we were literally buried in them! October at our house was all about the leaves.
When we moved into our house last year it was just before the transition between leaves and snow...so we had no idea just how many leaves our trees made in average fall...and truth be told, there came a point when we wished we had never found out. The first few dumps were fun, the tree in our front yard turned this amazing deep red color and looked like it was flaming, daddy and Caleb shared their first experiences playing in the leaves, and mommy got some great pictures of her little "leaf angel." But after a while enough was enough. It got to the point where not only could we not fit all of the leaves in our trash can each week, but if we went with out a day of raking they were staining every piece of cement on our property. Excuse me but I'm not sure we signed up for all of these leaves.
Now we're cutting back all of the trees for winter and attempting to clean up all leaves that escaped prior rakings as we prepare for small white flecks to fall from the sky and I never thought I'd say this but this new falling friend is quite welcome...thats right take away the leaves and bring on the snow...oh wait that means shoveling and snowblowing and slippery ice patches...come on there has to be a happy medium...and sadly enough I think here in Utah we call that medium ...Summer (ha!)
However our family would like to offer our gratitude to the beauty and fun that October's Leaves afforded us and ask that that they might take some mercy on us next year!
Tuesday, October 20, 2009
Tuesday Talk: WORDS
What is your favorite word? sooooo....Its how I end every sentence so I guess it would be my most frequent word...not necessarily my favorite....hmmmm I love the word fortuitous but its hard to bring it in to a conversation...I'm not even sure I now what it means...but I like it!
What is your least favorite word? I hate the word Pussy Willow, I so wanted them at my wedding but just couldn;t say that to a florist without blushing...so I had sticks instead :(
What turns you on? People who are smart and funny and caring, like my husband.
What turns you off? People who are extremely good looking and know!
What sound or noise do you love? Its a tie between a rainstorm and breaking glass
What sound or noise do you hate? The ticking of a clock...maybe because I'm always late or always have tons to do?!
What is your favorite curse word? I don;t really have a favorite, I try not to use them in general...but I say OMG alot...and I feel bad about it...becuase when I say it I make no connection with taking the lord's name in vein at all...its just a phrase or a figure of speech to me...so I have to work on that!
What profession other than your own would you like to attempt? I would love to be an artist or a writer...something where I can use my creativity!
What profession would you not like to do? Stock Hot Dogs and Bacon ....oh wait thats what I'm doing now!
If Heaven exists, what would you like to hear God say when you arrive at the Pearly Gates? You are officially debt-free...no seriously...money is the source of all that stresses me in life...so I hope there is absolutely no money or bills in heaven!
Wednesday, October 7, 2009
You Are The Color in My Life!

I brought a child into this dark world because it needed the light that only a child can bring. ~Liz Armbruster
Wednesday, September 23, 2009
Fun With Fabric!
 So I am having a blast in Tania Willis' Scrapbooking with Fabric class at Get It Scrapped! I never knew you could do so much fun stuff with fabric and I never knew that all those clothes piling up in my garage, would ever be so useful! Here's my latest creation for Tania's lesson on Using Fabric as Memorabilia.
If you're like me then you probably have a stash of baby clothes for each of your children (but you probably don;t have a stash that includes every piece of clothing your children have ever worn...I just couldn't bring myself to throw them away, :embarrassed:). So why not put some of the less sentimental pieces (like the romper that was all stained with carrots) to good use! In this lo I have cut out the patch that adorned one of Caleb's favorite rompers and used it emphasize my son (and his daddy's) love of basketball.
I also used another of Tania's fun techniques (her lessons are filled with brilliant ideas and step-by-step instructions) by creating a washed design on fabric . Using a plain old piece of white duck cloth, some crayola markers and some spray mist, I made this playful backdrop for my lo!
Who knew scrapbooking with fabric could be so much fun!!!!
Tuesday, September 22, 2009
To SEE...

"To see a world in a grain of sand,
And a heaven in a wild flower,
Hold infinity in the palm of your hand,
An eternity in an hour."
--WILLIAM BLAKE
Sunday, September 20, 2009
SHOW & Tell
Did you ever wonder what scrapbooking looked like 70 years ago or if it even occurred to people to "scrapbook" that long ago? Many of us already know the answer to that question if we were lucky enough to have a family member who has passed down recipe books, record books, photo albums, personal histories, etc. from their ancestors before them. We might also know that they didn;t have all the bells and whistles that we have today that make scrapbooking such a joy to us all. And if your like me...you might even know that they definitely DID NOT have ACID FREE paper 70 years ago. Arggggghhhh.
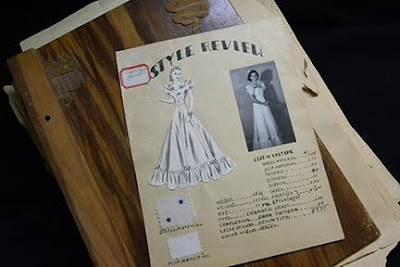
This is my grandmothers 4-H Record Book, she made when she was 17 years old, making this artifact just over 70 years old (my grandmother taught me better than to reveal her age...so you'll have to do the math!). I thought I'd take a moment and "share" this ongoing project of mine with you and "tell" you a little bit about why its so special to me.
First off, it must be said, that she was not your ordinary, run-of -the-mill, 4-Her, OH NO, she was a hard core, blue-ribbon, world fair winner type of 4-Her! So you could of course, expect no less of her record book. When I was young I used to love to flip through the kraft pages of this album and look at all of her drawings, and photographs of her projects and marvel at her amazing stories, as well as the handwriting that told them! The fact that my grandmother even allowed me to touch this book, let alone rifle its pages, was a huge honor, I now realize. However, these days I would not even dare to turn its pages for fear of them crumbling into nothing... apparently acid free paper was so overrated in the 30's (or non-existent)! So carefully and slowly, I am attempting to piece together her memories in an album that will live on for many generations to come!
Wednesday, September 16, 2009
Nifty Trick
In preparation for Lynn Weber's class Fun Photo Effects, at Get It Scrapped, I'm finishing up her self-paced intermediate photo editing class this week...and boy am I learning some cool stuff...this is my favorite so far:
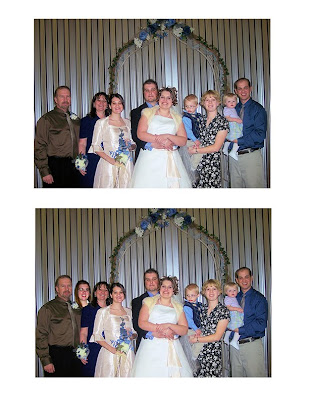
My SIL Sariah was serving her mission when my husband and I were married nearly 4 years ago...we joked about having a cardboard cutout there of her for photos...but this turned out to be much easier and cheaper! My husband's other sister and her family were from out of sate and they weren;t able to make it either...unfortunately I don;t think my skills are quite up to adding entire families yet...but I'll keep working at it!
Have you always wanted to learn to insert people into you photos...well pop on over to http://www.debbiehodge.com/ and check out Lynn's classes!
Monday, August 31, 2009
The Finale
For our final blog challenge for August, Michelle at GIS has prepared the following list for Make a List Monday so you can play along too! Just Copy my list and add your own answers or visit www.debbiehodge.com/gisforum for Michelle's original list.
Today I am looking out at the pergola in my backyard
Today I might cook steak and lobster...yum
Today I am reading my GIS buddies' blogs
Today my biggest priority is to get our car registered (nothing like waiting til the last minute)
Today I hope to see anywhere outside of my house
Today I hope to talk to one of my friends
Today I have already seen/talked to does my son count?!
Today I am watching HGTV...all day
Today I am dreaming that there were 48 hours in a day
Today I am wearing my pajamas...which reminds me I should go change!
Today my mood is lazy
Today I am going to go camping in my backyard with my son!
My Creative Process
I'd love to ramble on about this grand series of events that leads me to my creative destiny...but the truth of the matter is...most of my los, or projects, etc are born by simply wanting to use one single item...a photo, an embellishment...even something so simple as a font I happen to like. Then this simple inkling turns into a "full blown-hair-brained-Amy" idea (generously nicknamed by my DH). I never use the same process twice...I often wonder if I'd be a better scrapper if I did...but it's what works for me, as I'm sure over the years you've found what works for you. My creative process is ever-changing, as is my style...life's too short to make the same layout twice!
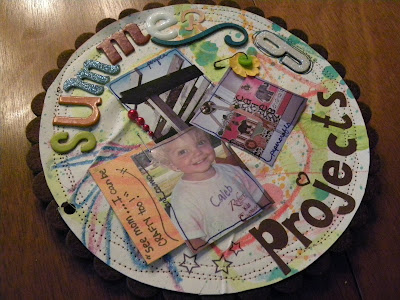
Today I had an urge to use a piece of art that my son and I completed at our local childrens museum. You know the feeling...your fridge is crawling with crayon drawings and splatter paintings...but what to do with them to make room for the next batch...do I throw them out? Never.... I couldn't even think of it...so we store them...where...oh here and there. Well I've got an idea that will help you put these to good use. Use them as patterned paper in your los, of course! Crayon drawings and splatter paintings work for any number of themes (i.e. school, kids, art journal, etc).
Today I had an urge to use a piece of art that my son and I completed at our local childrens museum. You know the feeling...your fridge is crawling with crayon drawings and splatter paintings...but what to do with them to make room for the next batch...do I throw them out? Never.... I couldn't even think of it...so we store them...where...oh here and there. Well I've got an idea that will help you put these to good use. Use them as patterned paper in your los, of course! Crayon drawings and splatter paintings work for any number of themes (i.e. school, kids, art journal, etc).
Sour Photos...Make Lemonade
Thats what Sherry Stevenson is preaching in her upcoming September class at Get It Scrapped and in the final installment of Thought Provoking Thurdays. Her challenge to us was to take our sour photos and scrap them. She even included this very helpful hint: Use your sour photos to support the story, while using a fantastic photo to steal the show!
Thats what I've tried to do here in My Dog-Garn Loveable lo. We have managed to capture quite a few breathtaking photos of our two loyal friends Coda and Maddie...but we've also taken our fair share of duds...particularly every photo of the two of them together! So in this layout I've chosen my two favorite pictures of my dogs to stand front and center, but have added a small photo strip off to the side to show them growing up together over the past few years.
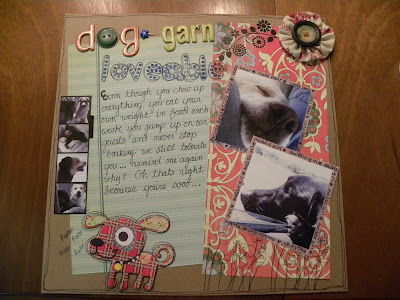
Thats what I've tried to do here in My Dog-Garn Loveable lo. We have managed to capture quite a few breathtaking photos of our two loyal friends Coda and Maddie...but we've also taken our fair share of duds...particularly every photo of the two of them together! So in this layout I've chosen my two favorite pictures of my dogs to stand front and center, but have added a small photo strip off to the side to show them growing up together over the past few years.
Most of the photos in the strip are low quality cell phone pictures...but this fact isn't quite as obvious because of Sherry's great tip...can't wait to see what else she has in store for us...I've got plenty of lemons!
Saturday, August 29, 2009
HB2U(Happy Birthday to You!)
So I'm not much of a card maker...but Sharyn's challenge for Wacky Wednesday was to make a card using a photo...so I took a crack at it. I never buy serious cards...so it goes to figure that I would never make one either...so I chose this funny photo of my son making blowfish faces because it reminded me of what we look like when we blow out candles. This card is for Caleb's g-pa Joe, written from his perspective...but from all of us!
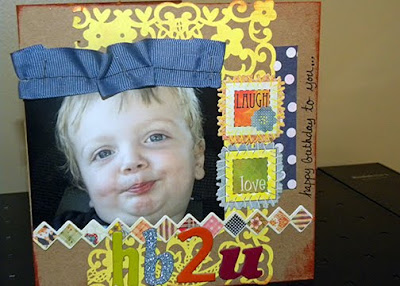
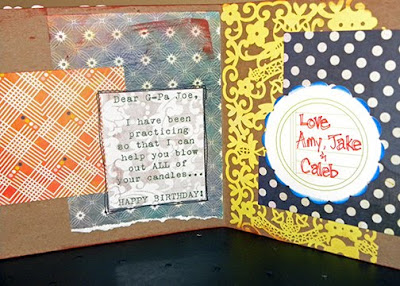

Photo Scavenger
The August Blog Challenge at Get It Scrapped is winding down with just three more challenges left...so today Katrina has brought back an oldie, but a goodie...for what better way to exit than the way you came in right!? Here are my photos for todays challenge...
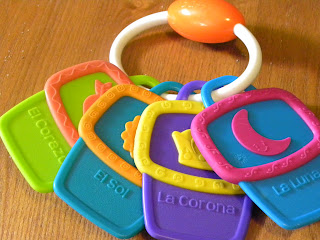
Something SWEET

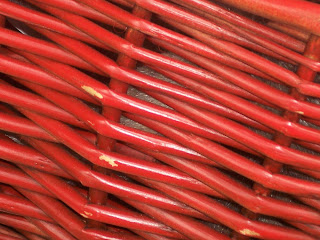
Something RED
FOUR of SomethingSomething SWEET
Monday, August 24, 2009
WooHoo! 1000 Hits
Yeeeeaaaaa!!!...my blog reached the 1000 hits milestone, I know...I know, some blogs receive a 1000 hits in a days time, so my measily 1000 hits in 4 months is pretty lame...but it was a goal of mine and I have reached it...my next goal is to be published in a magazine...now all I have to do is start submitting my work-- probably a good start...wouldn;t you say?!
Get 'er Done!
 Title Page from Jessica Sprague's Beautiful Evidence:20 Pages in 20 Days Album
Its another Make a List Monday and here's my to-do list for the day, how does yours measure up...have you got a full day planned or do you have plans with your TV remote and a bag of chips (I'm Jealous!)
- HOMEWORK
- CLEANING
FUN
Sunday, August 23, 2009
Speaking of Scraps...
On this Scrap Sunday, Tania Willis is challenging the members at GIS to take to their blogs and write about 1) a scrap project in the works; 2) how we organize our scraps; or 3) where we scrap. I can't wait to see what everyone is working, their scrappy spaces and get a whole bunch of great new tips on organizing my scraps! But in the meantime I'd like to share my contribution to Scrap Sunday with all of you.
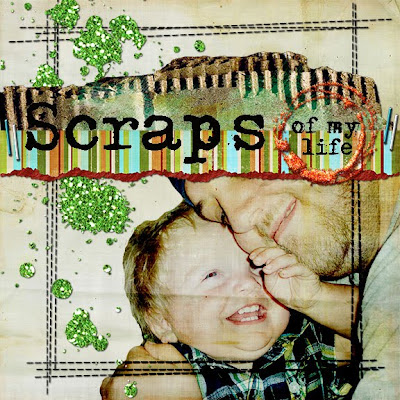
I recently received a free 8x8 Shutterfly album, from the Designer Digitals DigiCrop in SLC, so I'm working on 20 custom digital pages for this album that I have entitled "Scraps of My Life". This is my cover and I hope to fill the rest of the book with some of the layouts that manifest from Jessica Sprague's Beautiful Evidence :20 pages in 20 days online event.
Needless to say I will be busy over the next three weeks, finishing up my archived classes from GIS (ie art journaling, photo editing, handmade embellishments), taking my new class at the Sraground and playing with my kit on its way from Scrap This Kit, not to mention getting ready for Get It Scrapped's fall line of classes! Ready... set...SCRAP!
Saturday, August 22, 2009
PICTURE Perfect

You know...Katrina...I think that Robert Capa fellow may have been on to something, when he said "if your pictures aren't good enough then your not close enough." Because ever since I've taken Katrina's class (she is a big fan of "filling the frame" with your subject!)at GIS, I've seen my photos improve immensely! Sometimes just getting a little closer than you normally would or deciding that you don't have to get every inch of the subject into the frame can make all of the difference in the world. Perhaps thats the biggest thing I've learned from Katrina is deciding what needs to be in the picture and what doesn't...I believe this is called composition. Before Thru the Lens and Katrina's help with the Saturday snapshots I was just going thru life snapping away...making sure only to capture the moment, never thinking of HOW I wanted to capture the moment. But now I've got my eyes open (and glued to my camera lens) in hopes of not happening upon, but CREATING those perfect shots...like this one. Here my niece is sitting on the beach at Joe's Valley, looking out at her daddy doing tricks on the jetski!
So I'd like to take this weeks Snapshot Saturday as an opportunity to thank Katrina...not only for participating in this month's blog challenge, but also for inspiring me to give more to my photos..thru her lessons, and her art. I can't give all the thanks to Katrina on this particular photo though (though I could not have created this shot without her), as I must also thank Miss Lynn Weber for contributing her infinite knowledge of photo editing as well...together these ladies led me to a feeling of satisfaction with my photos that I had not yet known! Thanks Gals!
Friday, August 21, 2009
10 Random Things...
In an effort to get to know each other a little better all of us at GIS are sharing a little too much about ourselves...but its all in good fun...won't you join too?! For this week's Finding Fun Friday, list 10 random things about yourself, share as much or as little as you like! Now get to know me a little better by reading 10 Random things about Amy:
1. I love the smell of scotch tape (it has the exact same smell as the clear gummy bears...yum)
2. I used to strain my salsa...because I don;t like the texture of tomatoes.
3. I love watching the Wizards of Waverly Place and have convinced myself that I'm watching the Disney channel for my 18 mo old son.
4. I wear sandals in the snow and to go hiking...sometimes because I forget, but mostly because I just love wearing them!
5. I have an unhealthy obsession with the color green...and I have apparently imprinted this obsession on my son who will now only eat the green apple jacks and leaves the red ones behind.
6. I love the smell of rain...but I especially love the smell of Central Utah rain, the sage and rain mix to make this wonderful aroma that smells like spearmint gum!
7. I watch the movie Twilight once a week, only because I've read the books 3 times over...and their starting to show quite a bit of wear.
8. I often dream about scrapbooking.
9. I have a "smell bad phobia" I constantly worry about smelling bad, and apply deodorant 4-6 times daily...usually by the end of the day I have what my dh calls "under arm-or" in other words an impenetrable layer of deodorant. I'm always asking people if I smell bad...and in my experience people are rarely truthful about this!
10. I love the Rolling Stones...no explanation needed!
A Day at Joe's

Wow I guess its been a while huh?! Sorry guys...I'm doing a blog challenge at one of my "s-word"[s****booking] that shall not be mentioned in this blog, as per my previous promises to my wonderful family, sites. So our family blog has suffered some neglect as a result! But now to fill you in on what we've been up to! The Collard IIIs have spent this entire week winding down and allowing our sunburns to heal from our wonderful weekend of family fun at Joe's Valley, last Saturday. Caleb was the only one of us who managed to escape the suns wrath, and instead has a soft glowing tan of which I am severely jealous! And while my sister in law lost her glasses in the lake, our camera was full of sand, and grandpa Joe was unable to participate in our water actvities due to a leg injury...we still managed to have a blast--a la Collard! We were so happy to see Isaac, who has been busy working hard and taking care of his growing family, and we had lost of fun playing with his children Jenny (who had just had eye surgery and was not appreciative of Caleb's sand throwing, but is far too polite to have said anything), John (who is Caleb's new idol, he was simply in awe of John!) and tiny 3 mo. old Ellie (who slept most of the time despite the uncooperative winds, and whom I finally got a chance to hold...so precious!). Jaki was of course the master of ceremonies and treated us not only to a seamless day of fun, food and family, but also to a wonderful reunion of sorts. Jake's sisters Jesse and Sariah wowed us with their speed demon skills on the jetskiis and their wonderful babysitting skills as they entertained 4 kids simultaneously. Grandpa Joe blessed us with a wonderful prayer, but most importantly with his presence, even though he was not in the greatest of health.
Thursday, August 20, 2009
Ms. Alexys, Both Witty and Wise!
My niece Lexy is a wealth of wisdom and wit(or brutal honesty as I like to call it)! She never fails to leave us all amused with her bold comments, unless of course we are the target of her unintended scrutiny! Luckily I have only felt the sting of her truthfulness once, but I am able to look back on it with laughter! She came into the bathroom one day while I was doing my hair and told me my hair looked pretty...sweet right, so I of course said thank you...then she struck...by asking"why is your bum soooo big?" A little stunned I replied by sidestepping the question, "well it got bigger after I had my son," but she called me on my excuse by saying, "well my mom has had two kids and her bums not that big...." Yeah, I had nothing...I wanted to go to my room and cry, but instead I decided to treat her with the maturity that she..well...did not display, by saying, "well I guess I must have ate a little more than your mommy did...huh?" And at that she said "oh, that's ok I like to eat a lot too!" Ouch right...well it could have been worse, but needless to say I started exercising and dieting the next day! Some other Lexy favorites are:
I don't want the fat doll!
Maybe he has to fart?
Grandma, you're really old!
Your house is messy!
How come you only have boring baby toys?
You use the computer alot...do you have webkinz too?
And of course...the infamous "ewwwh", when discussing, aything to do with kissing, underwear/diapers, or watching out for dog poo.
Lexy says the darnedest things...but we love you girl...so I say...keep on keepin' it real!
Wednesday, August 19, 2009
Oh The Places I Go...
For the August Blog Challenge, the ladies at GIS want to know what your favorite places to go online are? Here are a list of my top ten most visited sites online...haven't heard of some of these?...maybe you should check them out!
1.Get It Scrapped
2.Facebook
3.Scrap This Kit
4.Chase Online Banking
5.The Spraground
6.Designer Digitals
7.Scrap Artist
8.Creating Keepsakes Magazine
9.Adobe Photoshop Online
10.Etsy
1.Get It Scrapped
2.Facebook
3.Scrap This Kit
4.Chase Online Banking
5.The Spraground
6.Designer Digitals
7.Scrap Artist
8.Creating Keepsakes Magazine
9.Adobe Photoshop Online
10.Etsy
Tuesday, August 18, 2009
What Smells Like Fish?
My husband says as he hobbles upstairs to see whats for lunch..."I don't know, maybe fish," is my reply. "I thought you were making tacos?" "I am...Catfish Tacos" He crinkles his face and I know he's going to give me a problem...I swear sometimes feeding my almost two year old is easier! But after he mocked choking down the first bite there were no more complaints from him or Caleb...because these catfish tacos were absolutely amazing. I got a great deal on Catfish (1.00/lb)at work, so we'll be eating a lot of it over the next few weeks...so my dh better "fish-up!" Give them a try..and I think you'll agree! Just click on the picture below for this deliscious recipe!
Photo by whatwereeating.com
Photo by whatwereeating.com
Monday, August 17, 2009
Collard-ish
For this week's Monday List, Michelle challenges us to search the deepest darkest corners of our family's secrets and share a list of "Family-isms". The only problem is that our "family-isms" are more like a language all its own, that my husband and I have compiled of "isms" over the years--some from his family--some from mine---and some that just manifested out of the blue! So the list might go on and on...but I'll just choose a few of our favorite to share with you.
 "SMASHELFACE" photo of Caleb Collard by Amy Kingsford
1. "Mech...." (This means...owell, no biggie...it doesn't matter) I say "Do you want mashed potatoes or rice?" My husband replies, "mmmm mech".
2. "Cajum Baby, Jay-chub, and Miamy" (These are our nicknames for one another)
3. "It's tired in here..." (or hungry or any other adjective we like to interject)
4. "Smashelface" (we originally used this term when we saw our son's fist 4D sonogram, but now we use it when he smashes his face up against windows, screens, and the mesh in his play pen!
5. "Super-Cagelistic-Wonderful" (I said this while in labor after they had to give me something to calm my nerves and it just sorda stuck...I think I was trying to say super califragulistic...but got confused somewhere inbetween!) I said "I feel absolutely super-cagelistic-wonderful.
6. "Warsh" (As in"I need to warsh my clothes"..."or where's a car warsh")
7. "Duggas and Ditties" (my son's words for doggies and kitties)
8. "Nonner do it" (we say this when we want to do something ourselves without help...because my nephew Jonathon (Nonner) used to say it all the time!)
9. "adding ink on the end of a word instead of in or ing" (As in "I'm starfink...where are the muffinks?"
10. "Good Shower," (just like good morning or good afternoon...we like to wish people good shower!)
Somedays I worry that our children will be devastated when they find out that "Mech" isn't a real word and won't understand when people look at them funny when they say "isn't today just simply super-cagelistic-wonderful," but at least they'll be unique and until then at least we'll have some family fun!
"SMASHELFACE" photo of Caleb Collard by Amy Kingsford
Subscribe to:
Posts (Atom)


