Before the month of December officially ends we are trying to squeeze a few more Christmas memories and traditions in! Last night Caleb had a blast while walking through "Christmas Village" in Downtown Ogden. Lucky (or unlucky...depends on how you look at it!) for us Caleb never tires of the mezmerizing lights! Christmas simply wouldn't have been the same without our beloved little man! The magic that only a child can bring to Christmas, was most certainly what got us through this hectic month!
Tuesday, December 29, 2009
Monday, December 21, 2009
The True Meaning of Christmas
Just around this time of year when I have a thousand things to do, and not enough time to do them all; when I'm standing in holiday lines and losing my patience with my fellow human beings; when I'm reminded of the harsh reality of our finances...or lack there of, I find that it is necessary to STOP, TAKE A BREATH and remind myself just what Christmas is all about! You see--its easy to get sucked into the shopping and the presents...the stress and the burdens but THIS is what Christmas is really about:
Joy came down on Christmas Day
As angels came to earth
Heralding the miracle
of our Messiah's birth.
- Anonymous
Labels:
This is My Life...
Monday, December 14, 2009
I Just Know...
Not only was I inspired by Tami's challenge @ GIS...to take to our blogs this month and write about how someone shows love for us, thru actions rather than words--but I was also very inspired by her own post at her blog Tidbits in which she equated her husband's love to the frequent gesture of Pepsi! So It is with that in mind that I, began writing the following post:
It can be said with absolute certainty that I love my son more than anything in this world! He is the most beautiful and precious thing in my life (don't worry dh you are a VERY close second!)! In my many scrapbook los and to anyone who will listen, I have atested to my insurmountable love for this adorable little boy! My son, on the other hand, tends to shy away from any type of actions that may show that this love is reciprocated. He hates kisses...he refuses to say "love you" and he reserves his best hugs for when daddy comes home from work! He does often give me gifts like cobwebs, ABC food and random objects he has picked up and is now finished playing with. But I don't think these things really say LOVE! He does, however, have a sixth sense about when mommy isn't feeling well or is upset and he reserves something special for those times. Caleb enjoys a good ba-ba when he isn;t feeling well...so it is natural that mommy would be the same...right? So Caleb totes the 20 oz of Diet Coke I am nursing over and says "MOMMA." Sometimes he even brings over empy cans or bottles...but always Diet Coke...because thats what momma likes in her ba-ba. Its a small gesture I know...but thats how I just know--He Loves Me!
Labels:
Get It Blogged
Saturday, December 12, 2009
That's a Wrap!
Time to get busy on my Christmas wrapping...now that I am done with with all of the gifts I've made this season! And let me just be honest with you...I hate wrapping...if I could pay someone else to do it for me...I would! But since that is not really an option, to save a little money this year we decided to buy brown shipping paper found a bulk roll for $5.00)and decorate with some homemade tags and leftover ribbon from last year! Give making your own Christmas tags a try this holiday season...Tim Holtz has a fabulous Blog Series going on right now "The 12 Tags of Christmas" with great step by step instructions, or Pattie Knox has some cute digital tags available for free download. You can even buy mailing labels and use your digital imaging software to make your own. I created mine on PSE 7, but will be printing them out on cardstock and tying them on with ribbon! Just a few idea for those finishing touches on your holiday gifts!
Labels:
Hybrid Hoopla,
Tutorials
Thursday, December 10, 2009
And The Winner Is...
WOW...look a little different around here...I'm doing some redecorating for the new year!
Anywho...the moment you've all been waiting for :drumroll: the winner of The Twelve Days of Christmas Drawing for a $30.00 gift certificate to ANY Get It Scrapped! class is:
Chris aka Scrappylassie said...
Another idea that is so versatile...can be made to fit holiday theme or everyday...thanks, Amy!
December 1, 2009 5:42 AM
Congratulations Chris! Please email or pm me with your email address so I can send you the gift certificate code! I'm dying to know what class you're going to take...!
Thanks to all of you for stopping by each day and for all of your wonderful comments! Beginning in January I will have project ideas available on the Get It Scrapped Forum, so keep a look out! Enjoy your Holidays everyone and I'll have many more fun projects for you in the new year!
Labels:
Giveaways,
Holiday Blog Series
Wednesday, December 9, 2009
Baby It's Cold Outside!
We just got back from a wonderful sledding trip not far from our home...Caleb's first! And BABY its cold outside! But you wouldn't know it to look at my new blog would you...I decided it was time for a face lift...and here in Utah where the temps are averaging 10 degrees, I thought a change that wouldn't remind me of the cold was in order!
The cold didn't seem to bother Caleb much...here he is literally rolling in the snow.I have a feeling this won't be out last snow day...so momma needs to get her some snow pants!
Labels:
This is My Life...
Tuesday, December 8, 2009
On the Twelfth Day of Christmas

DIGITAL SKETCH
Supply List
Frame (1.00)
Photoshop/PSE
Photo
Wow this has been fun, everyone! Thanks for taking time out of your busy holiday lives to pop in and take a look at my Christmas gifts over the past week and a half! I hope you've gotten some good ideas and I also hope that I've helped save you a little money this Holiday Season! Can you tell I'm a big fan of photo and digital gifts? The truth is they save a lot of money and time... something I think we are all in a bit of a shortage of around this time of year! My final gift idea was inspired by my Father in law, who loves the outdoors and enjoys the art of photography! Every year I present him with some type of photo gift...because out of everyone in my family I know he appreciates them the most. This year I took a photo of his favorite Mountain Range, located just a ways from his childhood farmhouse, and turned it into a digital sketch, using my Photoshop Elements filters, some fabulous directions provided in Pattie Knox's Even More Mad Digital Skillz and a frame from the dollar store! With Photoshop/Photoshop Elements you are not limited to Colored Pencil sketches such as this, you can turn your photos into paintings, pencil sketches, coloring book pages and more. Find out more about these techniques from Lynn Weber's class Fun Photo Effects.
If you are interested in brushing up on your photoshop skills to save some of the time and money that going digital affords, then you should definitely look into the variety of classes offered at Get It Scrapped for Photoshop users! I took my very first digi class with Pattie Knox and she had me Photoshoppin' in no time and I haven't looked back! Enter the drawing for the final time by leaving a comment in today's thread. All entries must be in by 8pm tomorrow and I will post a winner on Thursday the 10th! Thanks for joining me for some Holiday Fun! Happy Gifting!
Monday, December 7, 2009
On the Eleventh Day of Christmas
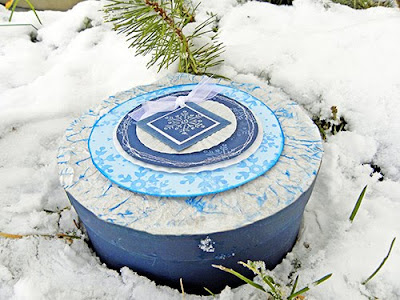
HOLIDAY GIFT BOX
Supply List
Small Tin or Box (1.00)
Solid Colored Cardstocks
Paint
Ink
Stamps
Embossing Powder/Pad
Heat Gun
Ribbon
Eyelet
Hole Punch
Coffee Filters & Muffic Cups
Pop Dots
Adhesive
Needle and Thread or Sewing Machine (optional)
Keep in mind your supply list may vary considerably from mine depending on how your choose to layer your gift box...but its a good starting point!
Can you believe it's almost over?! Me either:sad: Well I can't give you all of these gift ideas without an idea for something to put your gifts in...now can I! Here's an idea to help you dress up your Holiday tins and gift boxes quickly and easily and put the finishing touches on any gift you give this season.
Start with finding your gift box. It doesn't really matter the shape or size, as this design is easily adaptable. Dollar stores and local stores should still have a pretty good selection! Next choose your colors of cardstock, paints and ink pads so that they will all coordinate with each other. As you can see I have chosen navy acrylic paint, a dark cardstock and a lighter cardstock in blues, and a royal blue ink pad to stamp on the light blue and a chalky white to stamp on the navy. I have then chosen a white cardstock for matting and a fun glitter embossing powder to add a little zing to the center element of the gift box. You don;t have to stick to a monochramatic color scheme as I have...I simply wanted to give you an idea of how many colors to select in each of your supplies...so when it comes to COLOR, let your imagination soar! Begin by painting your entire box...INSIDE too! (if the finish that is on the box you've chosen does not coordinate with the rest of your choices...if it does then lucky you...you can skip this step!) Next you need to cut out the layers for your gift box lid. The first layer should be the exact surface size of your lid. I used a coffee filter for my first layer, which was 6 inches in diameter, I crumpled it and inked it and adhered it to my box with adhesive. Your next layer should be roughly an inch to an inch and a half smaller than your first. On this layer I used a snowflake stamp and my blue stamp pad to create a subtle print on my light blue cardstock and inked the egdes. I centered the piece and adhered it to the bottom layer using pop dots for a three dimensional look. Your next layer should be an inch smaller than the previous. On this layer I stamped with a chalky white stamp pad using a different snowflake stamp. I then used a muffin cup to mat this layer and stitched the two pieces together using my sewing machine. Again you'll want to center your layer and use pop dots to adhere it to your gift box. Now you'll want to determine how many layers will suit your gift box, but for my next layer I added a mini muffin paper cup that I used adhesive to secure it to the box. Then you'll want to have an eyecatching centerpiece for your final layer. I chose to create a tag out of my navy cardstock with chalked white edges, an 1/8 of an inch white mat and an embossed glittery snowflake. I completed the look of the tag by adding an eyelet for the ribbon to be threaded thru and tied in a bow. Secure your final layer with pop dots and your gift box is all set to fill with whatever you like!
Want to learn more about using stamps and inks to complete everything from cards to scrapbook los, to projects like these...then Sharyn Tormanen's Get It Stamped is perfect for you! Learn about embossing, masking,and shopping, as well as, caring for your stamps, all in one class, only at Get It Scrapped! Enter to win a drawing for $30.00 towards any Get It Scrapped class by leaving a comment below! Happy Gifting!
Want to learn more about using stamps and inks to complete everything from cards to scrapbook los, to projects like these...then Sharyn Tormanen's Get It Stamped is perfect for you! Learn about embossing, masking,and shopping, as well as, caring for your stamps, all in one class, only at Get It Scrapped! Enter to win a drawing for $30.00 towards any Get It Scrapped class by leaving a comment below! Happy Gifting!
Sunday, December 6, 2009
On The Tenth Day of Christmas

LAMP SHADE
Supply List
Lamp Shade (1.00)
Paints, Mists, Papers, Fabrics, etc.
Adhesives (appropriate for the mediums you are working with)
Needle and thread*
Decoupage*
Hair Dryer *
(not necessary for all methods of decoration...just the method I've outline here!)
Lamp shades are another fun way to use your creativity and a dollar to create the perfect gift for a loved one or friend. And best of all you can use virtually any medium to decorate them with (paint, paper, fabric, etc)...so use what you have! To find Lamp Shades at Rock bottom prices check your dollar stores, clearance sections at your Walmart or Target (where I found mine for $1.00), outlet stores that sell home decor such as Ross or Tuesday Morning, or even try online at ebay or overstock.com. Once you've found your shade, deciding on a basic color scheme and design would be beneficial so that you may work in layers. Now you're ready to start getting CRAFTY! Begin by choosing a method to cover your lamp. You could cover it with fabric, paint it, use paper piecing, leave it unfinished, or I chose to mist mine with a fabric mist (a lot like spray ink, but not water-soluble). These inks do have to be heat set, so I used my hair dryer (at a safe distance) to do so. Next I used a piece of bubble wrap and brushed it with white gesso and stamped it onto the surface of my shade. You want to make sure each layer dries completely before moving onto the next. So once dry I added my silk greenery using a needle and thread to tack it to the lamp shade in a location that I knew would be overlapped by my paper heart. The heart was a digital element that I printed out, trimmed and coated the back with a fast drying fabric adhesive. If you want you could place a thin layer of decoupage over the paper element to seal the edges, however I chose not to because I like the dimension created by the lifted edges. Then using a stencil, a stipple brush and some custom colored acrylic paint I added a little word art to my shade.
The layered collage look that I created on my lamp shade is just one of many ways that you could decorate your lamp shade...if this method suits you---well then you already to begin--if not, then I urge to experiment and find the right method for you and the person you are gifting! And if you'd like to learn more about layering and collage then you would LOVE Dina Wakely's Art Journaling classes available at Get It Scrapped. I love Dina's fun style and eye catching techniques, but the thing I love most about her classes is that she shares her process with you and essentially gives you the tools to develop your own style! Leave a comment in today's thread to be entered to win $30.00 towards any class at Get It Scrapped, including Dina's!
Saturday, December 5, 2009
On the Ninth Day of Christmas!
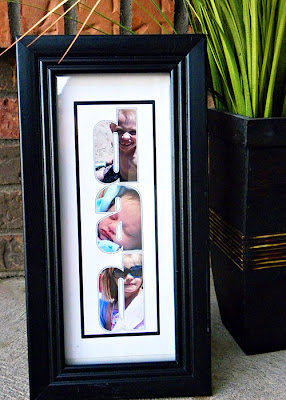
PERSONALIZED OFFICE ART
Supply List
Basic Frame (1.00)
Photoshop or Photoshop Elements
Supply List
Basic Frame (1.00)
Photoshop or Photoshop Elements
DIY Alpha or Font
Photos
Are you looking for that perfect gift for dad, or maybe you're searching for yet another way to gift your photos, well have I got an idea for you. Using Photoshop, a wonderful tutorial from Paula Gilarde and a little bit of creativity you can turn your words and your photos into art, that any loved one would appreciate! Start by choosing the word you wish to turn into art. Then you will need at least one photo for each letter of that word, that in someway relates to the word you have chosen or the person you are gifting. Open your photos in photoshop and then decide on a font or alpha. Don't have photoshop or photoshop elements...no problem click here for a free 30 day trial. Now I have used a DIY alpha by Pattie Knox called Text Bytes No. 17 or by following Paula's tutorial, you can use any font installed on your computer! Next open Paula's tutorial and follow each of the steps outlined by Paula and repeat them for each letter of your text. Once you are done you may need to re size your document based on the size of frame you will be using. And you may choose to place a border stroke around the edge to make your word art pop and presto, all you have to do is PRINT!
Paula has tons of great ideas just like this one, waiting for you in Paula's Hybrid Corner on the Get It Scrapped forum. If you are interested in digital scrapping but aren't sure where to start, then these FREE tutorials are just right for you! Leave a comment in today;s thread to be entered in the drawing for $30.00 towards any Get It Scrapped Class...See you Tomorrow!
Friday, December 4, 2009
On The Eighth Day of Christmas
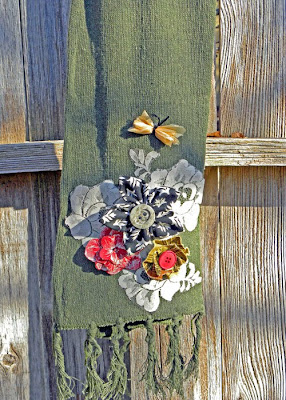
WINTER SCARF
Supply List
Scarf ($1.00)
Fabric and Lace Scraps
--AND/OR--
Premade Appliques and Embellies
Needle and Thread
Heat n Bond
Fabric Glue (may be needed)
Bring your friends and family a little warmth this COLD winter season, with their very own, one-of-a-kind, definitely made with love Winter Scarf (or gloves, and hats work too!) Peruse your local dollar store, or even the Walmart or Target in your area for low prices on winter basics. Then use your fabric scraps, pre-made appliques and embellies to jazz them up a bit, by adding a few personal touches. Start by raiding your stash and choosing fabrics, embellies, etc., whose colors, coordinate. Try using a variety of different prints and textures for a little bit of added interest! Now decide on a design...you can draw it out on paper to create a pattern or you can simply move things about your article until you like the looks of it! Use Heat n Bond to adhere larger elements, like I have done with my lace applique, and a needle and thread for smaller elements such as flowers or butterflies. Once all of your elements are securely fastened then stand back and admire your work (and don;t forget a pat on the back for a job well done!) because you have just completed a beautifully handcrafted gift for someone special!
Interested in learning more about using fabrics in your projects and lo...or maybe you've been wondering which kind of fabric adhesive to use with what...or maybe you are just dying to learn how to make those adorable rag flowers (I know I was!)...either way Tania Willis' Scrapbooking With Fabric class (available at Get It Scrapped) is definitely for you! Enter to win $30.00 towards ANY Get It Scrapped! class by leaving a comment below!
Thursday, December 3, 2009
On the Seventh Day of Christmas
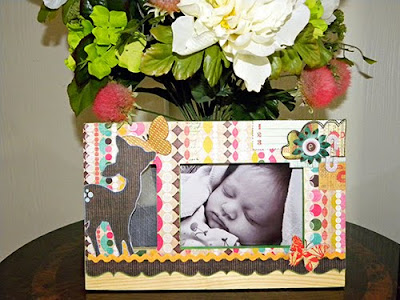
FRAME
Supply List
Frame (1.00)
Coordinating Patterned Papers and Scraps
Misc. Elements
Misc Alphas
Decoupage
Photo Frames are another way to make giving the gift of a photo special to the person you are gifting. It is also an excellent way to use up your scraps and left over embellishments and alphas. First you need to select a frame! Unfinished wood frames are in abundance at your local dollar stores, but are also available at your craft stores (I.e Michaels, Joann’s for roughly the same price). Now I like to approach my frames much like a scrapbook lo and do a brief sketch before beginning…this may or may not help you…but give it a shot. Once you’re set on a design begin by treating the edges of frame (inside and out). You can use ink, paint , wood burning or leave them unfinished…its up to you. But you’ll be happy you completed this step first after you get your frame all put together.. Now because some of the frame will be coated in Decoupage and other parts like your elements and ribbon will not need to be sealed, consider working in order as far as your layers are concerned. So our first layer will involve covering your frame with your coordinating papers and paper scraps by first applying a thin coat of decoupage directly to the frame. To cover your frame you can use a collage technique or a block design, or you can use a simple layered design like the one I’ve used here . After you’ve covered your frame with your paper then apply a generous layer of decoupage over the top, paying close attention to your corners and edges and making sure to smooth out any bubbles along the way. After the decoupage is dried you can continue with your other layers. Next use adhesive to apply your ribbon, flowers, embellishments, and alphas. In this frame I have used my nieces monogram EC, as well as using cutouts from various paper scraps to create the elements on the frame. If you too are using paper elements that you are concerned about their durability (like my butterflies), then coat them in decoupage and let them dry before applying them to the frame. Often wood frames do not come with glass in them but you can use glass from an old out-of use frame of the same size and it will likely fit the opening. Now you are ready to place you photo in it and give it as a gift!
My favorite part of this frame is my niece’s monogram in the upper right hand corner. I love the way that a pair of mismatched letters can really accent a collaged or layered effect! But I might never have used these alphas for that purpose if I had not read Debbie Hodge’s ebook Embellishing With Alphas . Not only does this book contain great ideas about using up your extra alphas, but it also teaches several important design principles that can not only be implemented with alphas, but with any type of embellishments! Get this amazing read today at Designer Digitals!
Wednesday, December 2, 2009
On the Sixth Day of Christmas...
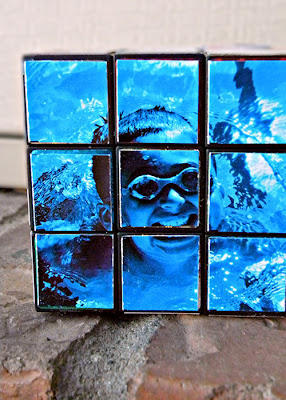
PHOTO RUBIK'S CUBE
Supply List
Rubik’s Cube ($1.00)
Adhesive Backed Paper
--OR-- Adhesive and Photo Paper
Computer Editing software (optional)
Paper Trimmer/Scissors
Ruler
Kids and adults alike, will love this new twist to an old game! First you need your cube...which are available at many dollar stores...or I got mine in the dollar bin at Michae's. Choose six photos of the person you are gifting, their family or even some of their favorite things. And using your photo editing software, resize your images so that they correspond to the measurements of your Rubik’s cube (they do vary in size!). I chose to recolor my images as well, for fun and to make it a little less challenging for my 8 year old nephew, but this is optional. Then print your photos on adhesive backed paper or even name badge stickers will work (depending on their size and the size of your cube) . Then measure your squares on the cube and cut your photo into equal number and sized squares (so that the cube is still a functioning game). Then remove the backing from your adhesive paper and apply each of the pieces onto the cube revealing your picture. Repeat with each of the six photos and you will have a fully functional photo Rubik’s cube! If you don’t have photo editing software then you have two options you can download a free 30 day trial of Photoshop Elements 8 here or you can simply crop down your 4x6 photos and apply your own adhesive to each individual square--paying close attention to the corners and edges to prevent lifting. Either way you’ve got yourself a personalized photo cube that is sure to be a hit!
Would you like to learn more about resizing and re-coloring your photos, you can learn these techniques and so many more from Lynn Weber at Get It Scrapped. She’ll have you using Photoshop or Photoshop Elements to edit your photos to perfection in no time at all! If you leave a comment in today's thread you can be enetered to win $30.00 towards Lynn's classes or ANY class taught at Get It Scrapped! Happy Christmas Crafting to All!
Tuesday, December 1, 2009
On the Fifth Day of Christmas

CHRISTMAS CARDS
Supply List (for one card)
Solid Cardstock
Coordinating Patterned Papers/ Solids
Black (or a dark coordinating solid) cardstock
Corner Rounder (or scissors work too!)
White and Black Sharpie or Gel Pen
Coordinating Alphas (1.00)
Ribbon
Paper Trimmer or Scissors
Adhesive
Still haven’t got those cards made yet…that’s ok…plenty of time…especially if you pick a simple design and use bold colors/patterns and some fun alpha stickers to really punch it up! Visit your local dollar store and you’ll be surprised of the variety of alpha stickers in stock! Now my card measures 5.5” by 7” but make it whatever size you like…just make sure it will fit in a standard sized card envelope for mailing. So after you’ve cut your card to size use a paper folder or even an unsharpened pencil or Popsicle stick to crease your card. If you’ve chosen to use a textured cardstock for your card make sure you place the fold so that the texture is on the outside , then find the front of your card and trim 1.5” off the edge and round your corners. Now measure the front of your card and take away a half inch from the height and a fourth of an inch from the width and this is the size you will cut from your patterned paper. Mount the patterned paper on the front of your card, using adhesive, so that there is a fourth of an inch of your solid cardstock showing on three sides and the paper is flush with the crease of your card.. Now mat the inside of your card with a third coordinating paper, by measuring the right side of the inside of the card and taking away a half of an inch off both the width and height. Mount using adhesive. Now its time to decorate your card. I chose to run a ribbon across the card, approximately an inch from the top of the card, repeat on the inside on the card making sure that the ribbon lengths match up. Now get out your alpha stickers and construct your sentiment . You can choose to spread the words over both planes of your card as I have done or you may decide you only want them on the front of your card and not overlapping onto your inside tab. Then choose a simple shape…such as a tree or a heart or a star, cut it out of your black (or dark coordinating solid) card stock and then cut it in half (if you are using both planes of your card). Adhere one half of the shape down in the front bottom right hand corner of your card and the other in the inside right hand bottom corner--making sure the images line up when the card comes together. Now take your Sharpies and do some outlining around your alphas, as well as your shape, to create some unity and make your elements pop!
Making your own cards for the holiday can be a lot of work...but it doesn't have to be...choose a simple design and wow with your colors and embellishments, and you'll be mailing those precious handmade salutations in no time! For more help on making your own cards including tips on designing, techniques and more step-by step tutorials, give Tania Willis' class Beautifully Handmade Cards a try--available at Get It Scrapped in self -paced format!
Subscribe to:
Comments (Atom)


