FRAME
Supply List
Frame (1.00)
Coordinating Patterned Papers and Scraps
Misc. Elements
Misc Alphas
Decoupage
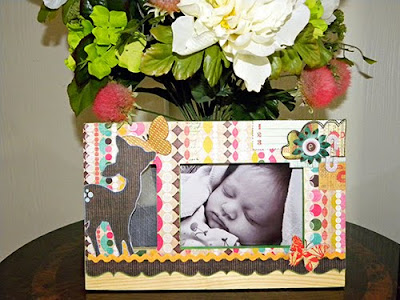
Photo Frames are another way to make giving the gift of a photo special to the person you are gifting. It is also an excellent way to use up your scraps and left over embellishments and alphas. First you need to select a frame! Unfinished wood frames are in abundance at your local dollar stores, but are also available at your craft stores (I.e Michaels, Joann’s for roughly the same price). Now I like to approach my frames much like a scrapbook lo and do a brief sketch before beginning…this may or may not help you…but give it a shot. Once you’re set on a design begin by treating the edges of frame (inside and out). You can use ink, paint , wood burning or leave them unfinished…its up to you. But you’ll be happy you completed this step first after you get your frame all put together.. Now because some of the frame will be coated in Decoupage and other parts like your elements and ribbon will not need to be sealed, consider working in order as far as your layers are concerned. So our first layer will involve covering your frame with your coordinating papers and paper scraps by first applying a thin coat of decoupage directly to the frame. To cover your frame you can use a collage technique or a block design, or you can use a simple layered design like the one I’ve used here . After you’ve covered your frame with your paper then apply a generous layer of decoupage over the top, paying close attention to your corners and edges and making sure to smooth out any bubbles along the way. After the decoupage is dried you can continue with your other layers. Next use adhesive to apply your ribbon, flowers, embellishments, and alphas. In this frame I have used my nieces monogram EC, as well as using cutouts from various paper scraps to create the elements on the frame. If you too are using paper elements that you are concerned about their durability (like my butterflies), then coat them in decoupage and let them dry before applying them to the frame. Often wood frames do not come with glass in them but you can use glass from an old out-of use frame of the same size and it will likely fit the opening. Now you are ready to place you photo in it and give it as a gift!
My favorite part of this frame is my niece’s monogram in the upper right hand corner. I love the way that a pair of mismatched letters can really accent a collaged or layered effect! But I might never have used these alphas for that purpose if I had not read Debbie Hodge’s ebook Embellishing With Alphas . Not only does this book contain great ideas about using up your extra alphas, but it also teaches several important design principles that can not only be implemented with alphas, but with any type of embellishments! Get this amazing read today at Designer Digitals!


6 comments:
Cute, cute, cute!
Look at you with all these fun $1 ideas! Loving the inspiration! Keep it coming!
You did it again Amy. I love this idea!!
Thanks again, you just gave me the perfect idea for one of my friends that it's been giving me a hard time choosing something meaninful and nice and special and cute...LOL
Gracias
That's just adorable! I've always thought that SL deer too precious to tuck away in an album - this is the perfect answer!
You are so talented Amy, this is just beautiful
Post a Comment