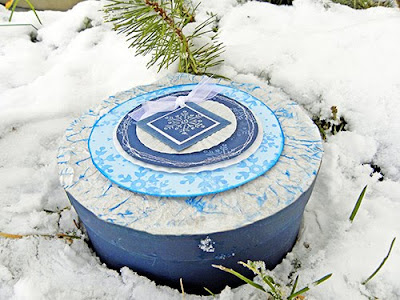
HOLIDAY GIFT BOX
Supply List
Small Tin or Box (1.00)
Solid Colored Cardstocks
Paint
Ink
Stamps
Embossing Powder/Pad
Heat Gun
Ribbon
Eyelet
Hole Punch
Coffee Filters & Muffic Cups
Pop Dots
Adhesive
Needle and Thread or Sewing Machine (optional)
Keep in mind your supply list may vary considerably from mine depending on how your choose to layer your gift box...but its a good starting point!
Can you believe it's almost over?! Me either:sad: Well I can't give you all of these gift ideas without an idea for something to put your gifts in...now can I! Here's an idea to help you dress up your Holiday tins and gift boxes quickly and easily and put the finishing touches on any gift you give this season.
Start with finding your gift box. It doesn't really matter the shape or size, as this design is easily adaptable. Dollar stores and local stores should still have a pretty good selection! Next choose your colors of cardstock, paints and ink pads so that they will all coordinate with each other. As you can see I have chosen navy acrylic paint, a dark cardstock and a lighter cardstock in blues, and a royal blue ink pad to stamp on the light blue and a chalky white to stamp on the navy. I have then chosen a white cardstock for matting and a fun glitter embossing powder to add a little zing to the center element of the gift box. You don;t have to stick to a monochramatic color scheme as I have...I simply wanted to give you an idea of how many colors to select in each of your supplies...so when it comes to COLOR, let your imagination soar! Begin by painting your entire box...INSIDE too! (if the finish that is on the box you've chosen does not coordinate with the rest of your choices...if it does then lucky you...you can skip this step!) Next you need to cut out the layers for your gift box lid. The first layer should be the exact surface size of your lid. I used a coffee filter for my first layer, which was 6 inches in diameter, I crumpled it and inked it and adhered it to my box with adhesive. Your next layer should be roughly an inch to an inch and a half smaller than your first. On this layer I used a snowflake stamp and my blue stamp pad to create a subtle print on my light blue cardstock and inked the egdes. I centered the piece and adhered it to the bottom layer using pop dots for a three dimensional look. Your next layer should be an inch smaller than the previous. On this layer I stamped with a chalky white stamp pad using a different snowflake stamp. I then used a muffin cup to mat this layer and stitched the two pieces together using my sewing machine. Again you'll want to center your layer and use pop dots to adhere it to your gift box. Now you'll want to determine how many layers will suit your gift box, but for my next layer I added a mini muffin paper cup that I used adhesive to secure it to the box. Then you'll want to have an eyecatching centerpiece for your final layer. I chose to create a tag out of my navy cardstock with chalked white edges, an 1/8 of an inch white mat and an embossed glittery snowflake. I completed the look of the tag by adding an eyelet for the ribbon to be threaded thru and tied in a bow. Secure your final layer with pop dots and your gift box is all set to fill with whatever you like!
Want to learn more about using stamps and inks to complete everything from cards to scrapbook los, to projects like these...then Sharyn Tormanen's Get It Stamped is perfect for you! Learn about embossing, masking,and shopping, as well as, caring for your stamps, all in one class, only at Get It Scrapped! Enter to win a drawing for $30.00 towards any Get It Scrapped class by leaving a comment below! Happy Gifting!
Want to learn more about using stamps and inks to complete everything from cards to scrapbook los, to projects like these...then Sharyn Tormanen's Get It Stamped is perfect for you! Learn about embossing, masking,and shopping, as well as, caring for your stamps, all in one class, only at Get It Scrapped! Enter to win a drawing for $30.00 towards any Get It Scrapped class by leaving a comment below! Happy Gifting!











6 comments:
I like the coffee filter idea. Super fun!
So pretty!
Another hit, Amy! I need to make a few boxes to put some goodies in...
This is a perfect idea for my friend who just loves boxes...any kind of boxes. How clever of you Amy to teach us to make one so pretty.
I love packaging that can be used for something else after. This looks lovely!
Just mailed a Hannukah package yesterday to my friend...could have used this box idea and incorporated this color scheme and a hannukah Star of David for the top...Missed the idea by a day:) next year!!great idea- can be used for any holiday!!!Thanks Amy
Post a Comment